
*Name thanks to Len Shinogane's post.

 Price: RM1X**
**May be cheaper or more expensive depending on locale.
Decided to get this when I bought the HGUC Banshee (DM) since I got a bit of cash coming back from selling off my excess cards. XP
I did want to get one last time (an original Bandai) but didn't in the end due to other, obvious, budget allocations. At any rate, lets see how this bootleg brand fares in my hands. Do note that the images are not as organized as before since I did this without much planning. I just took photos out of order as I build and play with the bootleg. Well, something slightly different, I guess? ^^;
Read on!
Section 1: Box


 Box is a flat out, but washed out colors, of the original - especially the information at the sides.
Section 2: Box Open!


Plastic wrapping is soft and you can obviously see the stickers being washed out as well. Interestingly, the color accuracy of the plastic is good.

 The manual is also a flat out copy of the original except it is, same as above, washed out and slightly blur.
Section 3: Runners


 Overall plastic quality is good with good color accuracy and matt surface. However, there are some rough patches around which I'll highlight some in the building process.
Section 4: Building Process
Since this is a bootleg, prepare some necessary tools such as a file or sandpaper (of various grits), paint markers (for touch up at least), hobby/stationary knife and lots of patience. Something like a hammer may be useful for this particular brand though. I used a metal stapler to "hammer some parts together". Serious. = |
Sometimes you may need to hammer parts to ensure they fit in. You may need to fix the connecting parts as well since some of them are too thick or too wide to fit properly.
Section 4.1: Head
 Some, if not most, parts exhibit seam lines and excess plastic. A bit of sanding fixes this however. Then again, more work is required.
 Note: Please cut the excess plastic poking at the chin space on the white mouth-piece.
 Stickers exhibit lack of color accuracy and are basically darker than what they should be. I just used them anyways since I wanted to do this bootleg model kit as leisurely as possible.
Section 4.2: Torso & Waist


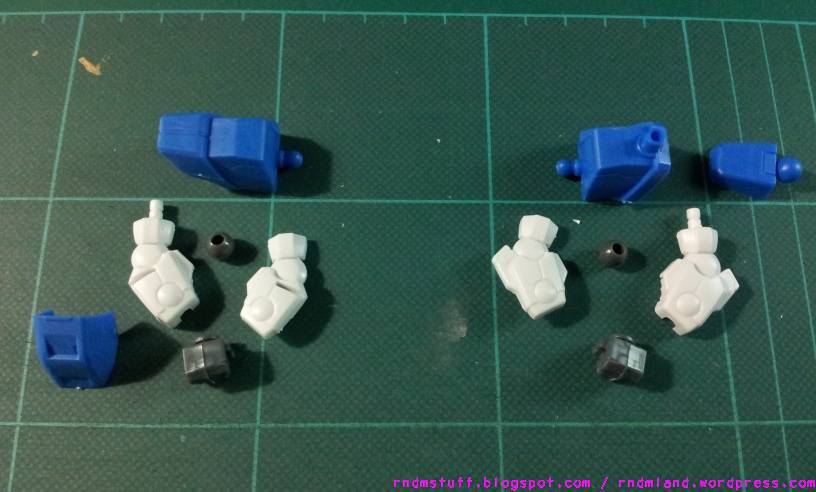
 This section was, surprisingly, quite straightforward. Don't really need to hammer it like the rest of the body. The rear-side of the GN Drive looks mighty awkward though and seems to be part of the original design of the BB. ...okay...
Section 4.3: Arms
 The more I continue, the more I actually want to paint this model kit, like the rest of my SDs. Then again...
 Oh my, just look at those seams (also on the shoulder armor)! Sandpaper is a must for this bootleg brand I see. =/
 The final outcome with stickers and panel lining and some sanding action. The hands are especially tight and you may want to mod it - if you can that is. I just hammered it in and can conclude that the plastic is mighty durable for a bootleg. FYI, there is no elbow joint.
Section 4.4: Legs
 The no-frills legs.

 The no-frills legs.
Section 4.5: GN Sword V & GN Sword Bits
 If you're painting this kit, prepare lots of blue and some gray. Stickers are available but not nearly enough (plus they look horrible).
 Note: Accidentally put the gray piece in the shield the other way around. A follow-up photo below in regards to the binder's gimmick updates the position though. ^^;;;
I have to say that the GN Sword V's handle is in an awkward position, especially in rifle mode since the handle becomes the wrong way around due to the SD's obvious hand limitations.
Section 4.6: Stand

 For a bootleg, I have to admit the stand is very good - color, reproduction and actual use. Just make sure you connect everything properly.
Section 5: Simple Comparison
 If you have bought any of the recent (for the past few years since BB Sangokuden) SDs/BBs, the 00Q is pretty much standard fare. And yes, the Wing EW is taller, inclusive of elbow joints!
PS: TBH, forgot to take a shot with the usual empty bottle of mint. >_<;
Section 6: GN Buster Sword II (Setup)


A very simple and straightforward setup. Sadly the tip of the buster sword cannot open for the actual rifle mode though you can still do it, somewhat.
Section 7: Articulation & Gimmicks
 Shoulder and binder articulation.

 Neck articulation. Shoulder armor and binder can limit some of the movement however.
 Waist articulation.
 Typical SD (Sangokuden) articulation.
 Binder is limited to ball joint movement plus connections are pretty tight on this model kit.
Binder Setup

 Pull out the long cylindrical piece out and turn it around then reinsert. (It has a high chance of getting stuck like that though.)
 Disconnect and position the binder as shown above. I disconnected the cover since it doesn't like to stay on when opened.
 Connect as shown.
 Finally, orientate the cover as shown. You can swivel the binder around but take note it'll bump with the head in this position.
Section 8: Action!***
***Close-ups are actually done together with action poses. The model kit isn't all that big so most of the detail should be easily observable.
***Close-ups are actually done together with action poses. The model kit isn't all that big so most of the detail should be easily observable.

 *PEW**PEW**PEW*
 Dual wielding since the small tab can be held by the SD. Me gusta. =D
 "Come at me bro."


 A little crossover plus new banner.
Section 9: Conclusion

Pros
- Cheap @ RM1X.
- Color accuracy is 95% accurate to original, except stickers.
- Matt plastic.
- Tight joints/connections.****
Cons
- Hard to build. Requires additional effort to ensure parts fit together.
- Excess plastic requires additional cutting and sanding.
- Missing some small finer detail.
- Tight joints/connections.****
Overall, it is okay but a good amount of patience, strength and time is required. For around 1/3~1/4 of the original's price, it may be a reasonable deal for some.
- For those who loves to have a challenge, even when building SDs, this brand is for you.
- For normal people, especially kids and newcomers to the Gunpla world, avoid this brand - you may hurt yourself in the process.
- If you really want that challenge, proceed.
That's all for now! The review is kinda so-so actually but I hope it gives you all an insight to this new brand discovery. ^^;
PS: I still prefer Gao Gao (TT Hongli) and Dragon Momoko.

1 comments:
Hi where buy the gundams of tt hongli , 0 raiser and 00 Q Warrior
Thanks
Post a Comment