
 Price: 1800 Yen
This review is much different than usual since I modded and painted this kit so it isn't a OOB review unfortunately.
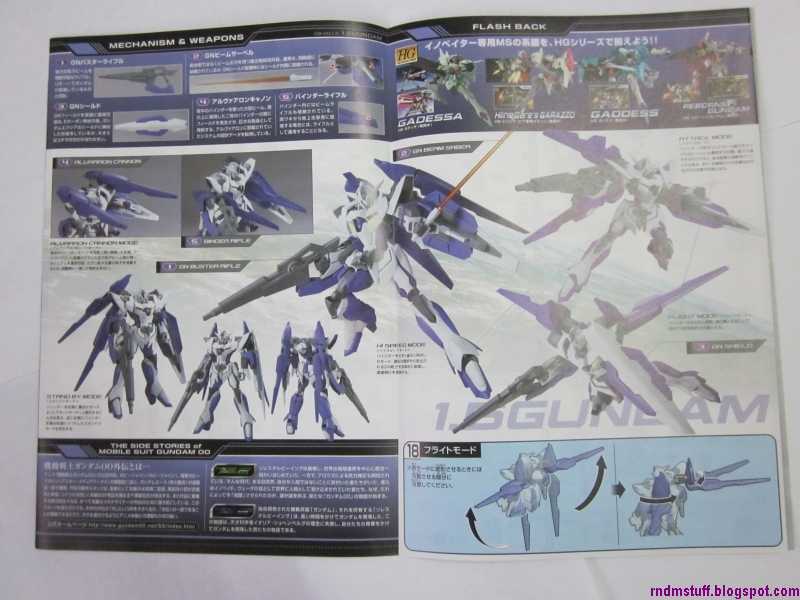
MS Brief
The 1 Gundam or Ai Gundam appeared in the Gundam 00P side-story. It was originally meant to be used for Celestial Being's interventions but a rebellion happened thanks to Besides Pain and it end up being wrecked. It later appeared in Gundam 00I utilizing a fake solar furnace instead. It was, luckily, taken care by Fon Spaak. The 1.5 Gundam or Aizu Gundam, an upgraded model, was recently shown through the model kit release as well as in Gundam 00P Special Edition. I might be wrong or not so accurate since I'm doing this based on memory.
MS Specs
CB-001.5 - 1.5 Gundam
Pilot: Besides Pain/Leif Recitativo*
Height: 23.3m
Weight: 68.9t
Armaments: GN Buster Rifle, GN Beam Saber (2), GN Shield, Alvaaron Cannon**, Binder Rifle**
*Leif Recitativo gets "possessed" by Besides Pain.
**The weapons of the wing binders. This is where the data of the Alvaaron came from anyways.
Why did I decided to mod it?
It started when I finished building the HG Reborns Gundam a while back. I was quite disappointed with the hips articulation since the kit has so much promise. It was okay to me at first but the ball joints start to sag horribly after a short period of time.
Then came the HG 1.5 Gundam or Aizu Gundam which I prefer to call it. Ever since the Ai Gundam was shown in 00P, I liked it, more so when it was considered as "Gundam Exia's Brother Unit". At that point of time, I had an un-built HG 00 Gundam body due to the double purchase of HG 007S/G. I didn't need it so it was a good opportunity for me. To be exact, I wanted to do it for the HG Gundam Exia but it was much harder to do and required more effort. For the Aizu, it was more straightforward and I can do it with what I already have in possession. Thus, with the semester break, I did it.
Took me a while since I needed to get some spray cans as I decided to paint it after modding to make it more "complete". I don't really like half-assed things. Since I'm doing quite a major mod so I better go all the way, right?
More as you read on.
Part 1: Box


Part 2: Box Open!


Part 3: Runners


 I have to admit, I felt the amount of runners and parts quite lacking for this kit which doesn't justify the 1800 Yen price tag actually. Well, it actually felt just a tad bit less than Reborns Gundam which the runner are originately molded for but I guess there is no chance of Bandai selling variations cheaper or even if they do, it'd be rare to see. Then again, could just be me.
 You got an option to either build it with purple or blue eyes. I prefer purple but ended up with blue due to the final color scheme. ^^;
Part 4: Building Process
Since I'm modding and painting this kit, the building process is quite different this time.
Before I actually bought and built the kit, I thought of how to mod it first and I needed these;
- Drill bits of various sizes.
- Superglue.
- Epoxy.
- High grit sandpaper.
- Knife... I just used my usual stationary knife.
- HG 00 Gundam. I already have a spare so it's alright.
As for painting, I got some Nippon spray cans. They aren't hobby spray cans so they are not "guaranteed". However, I have to say they work wonderfully so you can try it too if you want. My friend did and he was the one who suggested it to me. Make sure you make a paint booth and wear a mask when spraying, okay?

 I just used my cheap purple permanent marker and make them clear purple before I start the build.
Part 4.1: Torso


 No stickers or detailing was done since I'm gonna take the body apart when I am going to paint it. I decided to superglue the two halves of the blue "stomach" area since I found out it was a bit loose on my Reborns. I also sanded almost every nub mark, for the whole kit of course, that I felt will hinder the paint job as well as stand out if I didn't.
Part 4.2: Head

 Forgot to takes the parts of the head but it is the same as the Reborns. I sharpened the V-Fin of course.
Part 4.3: Arms
 Lots of parts here especially since I'll be painting it. ^^;
 I superglued the two halves of both sides of the arms. Do note the peg on the top left which is a lock to prevent the arm from bending too much. You can get rid of it if you want the same articulation range as Reborns.
 Note that the gray part near the "circle" can swivel in and out. Too bad I can't really move it after painting though. ^^;
 Not much bending since I left the pegs alone, eh?
 Looks great even though un-
detailed. This really tells us that HGs have gone through quite a lot to get this good. =)
Note: I didn't show the GN Drive and the "ring" that holds the wing binders here. As for the GN Drive, I decided to use the excess parts of the Aizu (Reborns GN Drive) which is much easier to detail since I won't need to mask it. Eheh. Of course, I had to drill the thing a bit so that it can connect as the connection is bigger than on the Reborns.
Part 4.4: Legs & Waist
Just follow the link above to see that part since I already posted it up a while ago since it was one of the highlights of this build of mine.
Of course, I did improve on that and can be seen below.
After getting some feedback from some of you, I decided to reinforce the waist section with epoxy which does work out very nicely in the end. As for how I did it...
 Since I didn't have any pla-plates, I cut out the thin sections of the runners. I decided to use the one from my TT Hongli kit since it has less stuff imprinted on, thus more even. Hope you get what I meant.
 I slowly cut out the unneeded bits which leaves me with a small "pla-plate" which should suffice for small stuff and what I'm doing at the time.
 I roughly estimated the space needed and cut accordingly. I stuck one side first with superglue...
 ...and filled the space a bit with epoxy and then stuck in another piece of the opposite side. I continue to fill in the gap after that. The part is left to dry for a whole night. After that, I sanded off the excess.
 I cut out some "pla-plates' again and sanded them into shape slowly. Took a while and they fit in and stuck there without need of glue. Nifty.
Part 4.5: Wing Binders


 Quite a lot of articulation points for the wing binders which gives a lot of playability to the Aizu.
Part 4.6: Buster Rifle, Shield, Beam Sabers


 Pretty straightforward here so there isn't anything I think I need to say. :P
To be continued...
Continue onto part 2 here!

10 comments:
So that's how...
Question: What kind of marker you'd used for the clear parts?
For the purple ones, I just use a purple permanent marker. Works alright with a bit of "dots" but hard to see after you put on.
For the green or red ones, I used an unshaken Gundam Marker. An unshaken marker will tend to give a translucent color.
Oh yeah, it is best to use those metallic Gundam markers instead of the standard ones.
Nice step by step write up of the building process hehe ^^ Up and coming modeler!!
Now as Billy Mays Bashed The Liquid Expoxy, I really dont like working with that stuff, plus there messier...(Mighty putty[Hell no!])
The Tamiya brand ones, the one were you knead two putty together works perfectly, for filling in gaps or making a completely seperate solid piece.Though there pretty expensive and drying time ussualy takes more than a week too fully dry.
But Im surpirsed the pelvis holes for the legs are filled in by flat runner plastics, Nifty
yeaahh, using leftover runners~ we modders gone through the same paths~ even so, i'm still making use of leftover runners, taking that how handy they are. great one~
The epoxy looks translucent?
@chubbs: Thanks. =)
@GunStray: At least they work well for simple stuff like this but I'll need proper putty next time.
@ZD: Yep, used them since they make a good cheap alternative. ^^
@Marzz: Yep, the one I got is a translucent one.
NICE customize, like that the 1.5 gundam the articirculation is better
Did you know you can shorten your long links with AdFocus and get money for every visitor to your short links.
Post a Comment